Impastoshop
AD Impastoshop – Help & Troubleshooting
You can read or download the User Manual here:
AD Impastoshop – User Manual (PDF – 5,7Mb.)
Important Notes:
- This Panel requires a 300dpi document to work as expected, any other resolution will affect the layer effects in an undesirable way.
- As -when launched- AD Impastoshop will replace your Patterns and Layer Styles I highly recommend to backup that files before launching the panel (instructions below).
- The Impasto effect works much better using a neutral color as background, neither white nor black.
- For better visualization and organization each Impasto layer has a colour assigned depending on it’s category (Eg: Dry Gesso layers are Yellow, Wet layers are red, etc.).
Installation (PS CC, CC2014 & 2015)
If you got used to install your Photoshop Extensions using the Adobe Extension Manager please forget to use it with Photoshop CC2014 & CC2015! Adobe no longer supports it. You could using it for Photoshop CC but for newer versions I recommend to use the Anastasiy’s Extension Manager a free and user-friendly installer / uninstaller for Adobe extensions.
- As -when launched- AD Impastoshop allways replace your Patterns and Layer Styles I highly recommend to backup that files before launching the panel (instructions below).
- Close ADOBE PHOTOSHOP CC 2014, CC 2015 or Higher
- Download the free Anastasiy’s Extension Manager from http://install.anastasiy.com and launch it.
- Extract the contents from the AD-Impastoshop.zip file.
- Launch the ‘Anastasiy’s Extension Manager’, click ‘Install’ and search for the ad.impastoshop_cc2016.zxp file.
It will place all the required files and after a couple of seconds a message will tell you the Extension was Installed Successfully!
Close the Installer. - Restart Photoshop. You will find AD Impastoshop at:
Photoshop > Window > Extensions > AD Impastoshop
How to backup your patterns and layer styles.
- Open the Preset Manager:
Photoshop > Edit > Presets > Preset Manager - From the ‘Preset Type’ dropdown menu select ‘Patterns’, once the patterns list is loaded click the first pattern, then hold down the keyboard Shift key and Click the last pattern to select All the patterns, then click ‘Save Set’, save it to your hard disk and you’re done!
- Repeat the same process and select ‘Styles’ to save your ‘Layer Styles’.
- Close ADOBE PHOTOSHOP CS6.
- If it is not already installed on your machine, please install the Adobe Extension Manager CS6:
https://www.adobe.com/exchange/em_download/em6_download.html - Launch ‘Adobe Extension Manager CS6’.
- Click ‘Install’ and search for the ‘ad.impastoshop_CS6.zxp’ file.
Don’t care about the message saying it’s an ‘Unsigned’ Extension, install it anyway! - Once the installation is complete restart Photoshop.
- Launch the Preset Manager:
Photoshop > Edit > Presets > Preset Manager - From the ‘Preset Type’ Dropdown menu select ‘Patterns’ then click the small gear icon from the top right corner to open the options list, select the ‘AD Impastoshop’ item wich will load the Impastoshop Texture Patterns.
- Repeat the same procedure for the other presets:
Click ‘Preset Type’ and select ‘Styles’ then click the gear icon and select ‘AD Impastoshop’
Click ‘Preset Type’ and select ‘Tools’ then click the gear icon and select ‘AD Impastoshop’ - Finally load the required Actions (Backup your actions before anything!):
Click Photoshop > Window > Actions
Click the small icon from the top right corner to Open the Menu and from there Select ‘AD Impastoshop’ (Not mandatory but I suggest to replace your current Actions with the Impastoshop Actions)
If you want load also the ‘AD_Impastoshop_Textures’. - For Photoshop CS6 and CC use -again- Adobe Extension Manager CS6 or CC
Select AD Impastoshop and click ‘Remove’. - For Photoshop Creative Cloud higher than CC 2014 use the Anastasiy’s Extension Manager.
- This Panel requires a 300dpi document to work as expected, any other resolution will affect the layer effects in an undesirable way.
Impastoshop also loads and requires a set of Layer Styles, without that set you can’t use the main effects of this panel. So… Do not replace or delete that set of Layer Styles! - As -when launched- AD Impastoshop will replace your Patterns and Layer Styles I highly recommend to backup that files before launching the panel.
- The Impasto effect works much better using a neutral color as background, neither white nor black.
- For better visualization and organization each Impasto layer has a colour assigned depending on it’s category (Eg: Dry Gesso layers are Yellow, Wet layers are red, etc.).
- When clicking some brush icons the brush doesn’t change.
This happens when you have activated the option “Current tool only” in the bottom of the Tool Presets window (Photoshop > Window > Tool Presets). Uncheck that Photoshop option.
Installation in Photoshop CS6 using Adobe Extension Manager CS6
NOTE: If you want to use AD Impastoshop with Adobe Photoshop® CS6 you CAN NOT use the panel because it uses a different technology wich is only supported by newer versions of Photoshop
but… YOU CAN STILL USE IMPASTOSHOP TOOLS WITH CS6! Follow these steps:
Parts of the panel
Add Base Texture
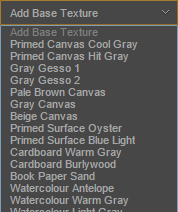
The first dropdown menu lets you add a texture as a base for your artwork.
It doesn’t matter wich is the size of your document, the texture will cover the 100% of it.
Create Impasto Layer
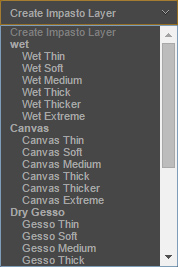
The second dropdown menu contains the main Impasto layers grouped into this categories: Wet, Canvas, Dry Gesso, Glue Gesso and Abrasive.
Each time you select an item, a new layer will be created with the corresponding effect.
Add Impasto FX
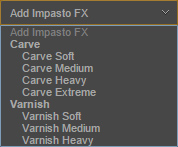
This third and last dropdown menu has some special effects (Carve & Varnish) that could be combined with the main Impasto layers.
Rasterize All FX:

The function of this button is to render / rasterize the effects in all the layers having an effect. As adding to many layers with FX could slow down the Photoshop performance, this function may help to keep the actual document as lightweight as possible.
Note: In order to view it as expected Carve and Varnish layers need to change their ‘Layer Mode’ to ‘Linear Light’ after rasterization.
FX + Paint:

It doesn’t matter wich is the FX of the current layer, this function will make visible the effect and the colour of your brush strokes.
Eg.: Usually, if you paint over a “Carve Layer FX” what you see is just the transparent effect, the opacity of the contents (color fill) is turned to 0%, so this function will put the contents opacity back to 100% to make it visible.
Only FX:

This function in combination with each Impasto Layer will add a bunch of other effects to the default ones.
The Impasto Layers have the fill opacity at 100% by default, that means when you paint you see the colour of your strokes plus the layer effect, if the fill opacity is down to 0% the strokes colour turns invisible but the layer effect is still visible. That’s what this button makes: hide your strokes but keeps the layer fx intact.
Duplicate FX:

Each time you click this button your current / active layer is duplicated without it’s contents.
Very simple but really necessary to produce a realistic Impasto or thick paint effect building up your artwork with several layers.
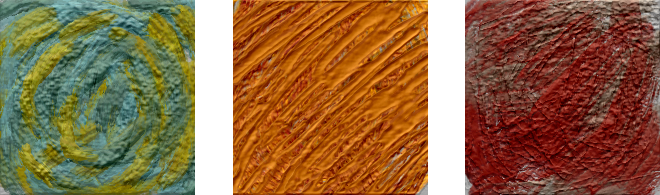
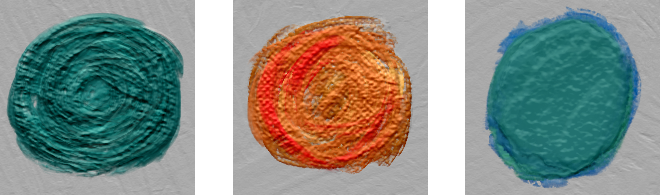
The Brushes
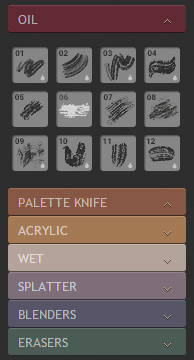
The panel contains 76 brushes inside seven categories:
Oil (12 brushes), Palette Knife (8 brushes), Acrylic (16 brushes), Wet (12 brushes), Splatter (12 brushes), Blenders (8 brushes) and Erasers (8 brushes).
AD Impastoshop doesn’t replace, overwrite or change your brushes or tool presets, so you could use the panel and also load and use your daily brushes or/and tool presets without worries.
TIP: How to use most of the Tool Preset Brushes as Erasers
Merge Selected

This is another function to help you taking down the weight of your document.
Just select a group of layers and click the button: the layers are going to be merged with all the effects rasterized.
Texturize
Use this function once you’ve finished your artwork. It will duplicate and save a greyscale version of your artwork in a Desktop folder (AD-Tools) and then it will use that image to apply texture in a new layer with a mask.
You could paint over that mask to hide the textured parts that you don’t want to show.
Additional Options:

Clicking the small icon in the right top corner of the panel you could access to some Quick help as the AD Impastoshop version, some basic instructions and a link to this On-line Help.
How to use it
First thing is to take in mind how the real Impasto works:
“Impasto is a painting technique, where paint is laid on an area of the surface very thickly, usually thick enough that the brush or painting-knife strokes are visible. Paint can also be mixed right on the canvas. When dry, impasto provides texture, and the paint appears to be coming out of the canvas.”
so do not cover all your canvas with colour but paint with visible brush strokes using as many layers as you need.
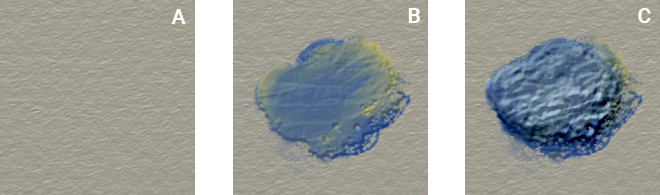
Once you’ve created a New 300 Dpi Photoshop Document and launched Impastoshop (Photoshop > Window > Extensions >) add a Base Texture (image A) from the first menu (it’s not mandatory but I highly recommend to start with some neutral background, neither white nor black).
Then use the second dropdown menu to create a new ‘Impasto Layer’.
Open any Brush group, click a brush thumbnail to select it and start painting (image B)
Use the ‘Duplicate FX’ button to add more layers and paint over. That will generate the ‘deep’ effect in your painting (image C)
Go ahead and experiment with different kind of Impasto Layers and different brushes!
Uninstall
Troubleshooting