AD Brutus Symmetry
Help & Troubleshooting
If Hermann Rorschach were still alive he would surely be using ‘Brutus’ to perform his tests!
Brutus is Adictive! Awesome for Character design! Fantastic for Brainstorming!
Until Adobe makes Photoshop realtime symmetry possible this tools are the closer approach you could have. It basically uses Photoshop guides (vertical and horizontal) as Axis for the symmetry, but it’s not limited to guides, it also works with selections and for fastest use we can assign shorcuts to the main functions.
Brutus is a great companion for your artist toolbox! Watch it in action…
You can read or download the PDF Manual here: AD Brutus Symmetry – Manual (PDF – 2,9 Mb.)
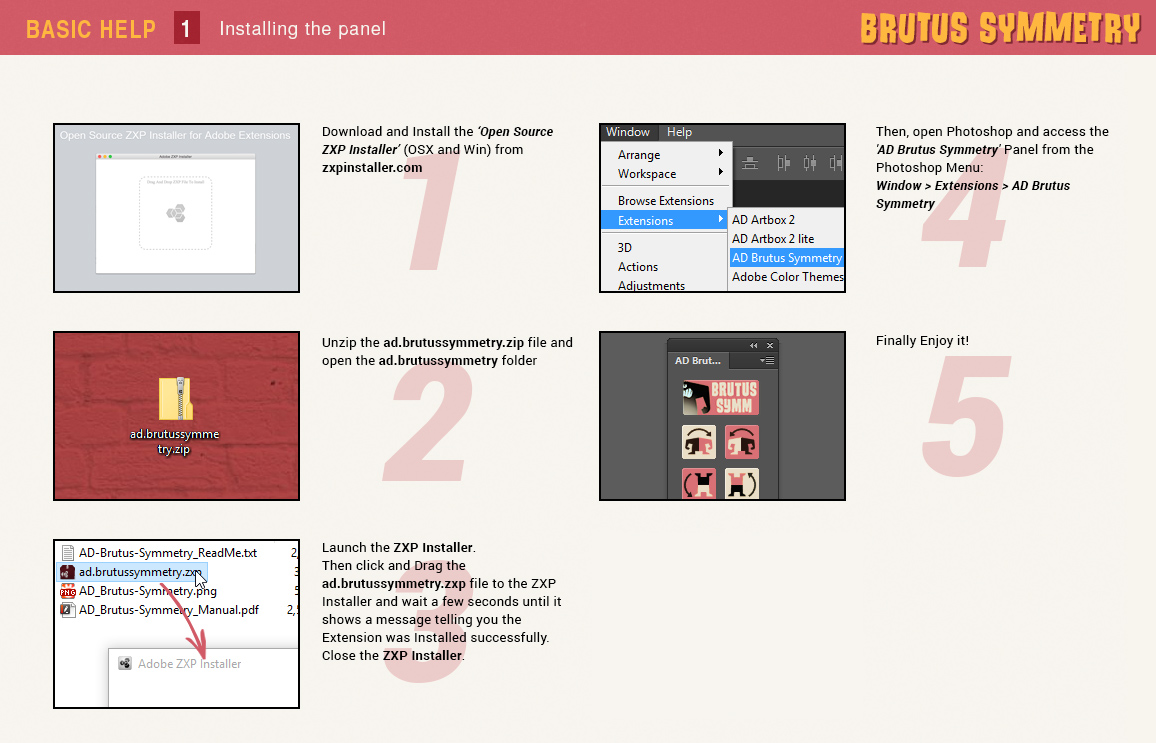
Installation in Photoshop CC 2014 or higher.
- Download the free ‘Anastasiy’s Extension Manager’ (OSX & Windows) from http://install.anastasiy.com and Install it.
- Extract the contents from the ad.brutussymmetry.ZIP file
- Launch the ‘Anastasiy’s Extension Manager’, select your Photoshop version from the left side list and click ‘Install’
Search for the ad.brutussymmetry.zxp file.
It will place all the required files and after a couple of seconds a message will tell you the Extension was Installed Successfully!
Close the Installer. - Launch ADOBE PHOTOSHOP
- Then, you can access the ‘AD Brutus Symmetry’ Panel from the Photoshop Menu:
Window > Extensions > AD Brutus Symmetry
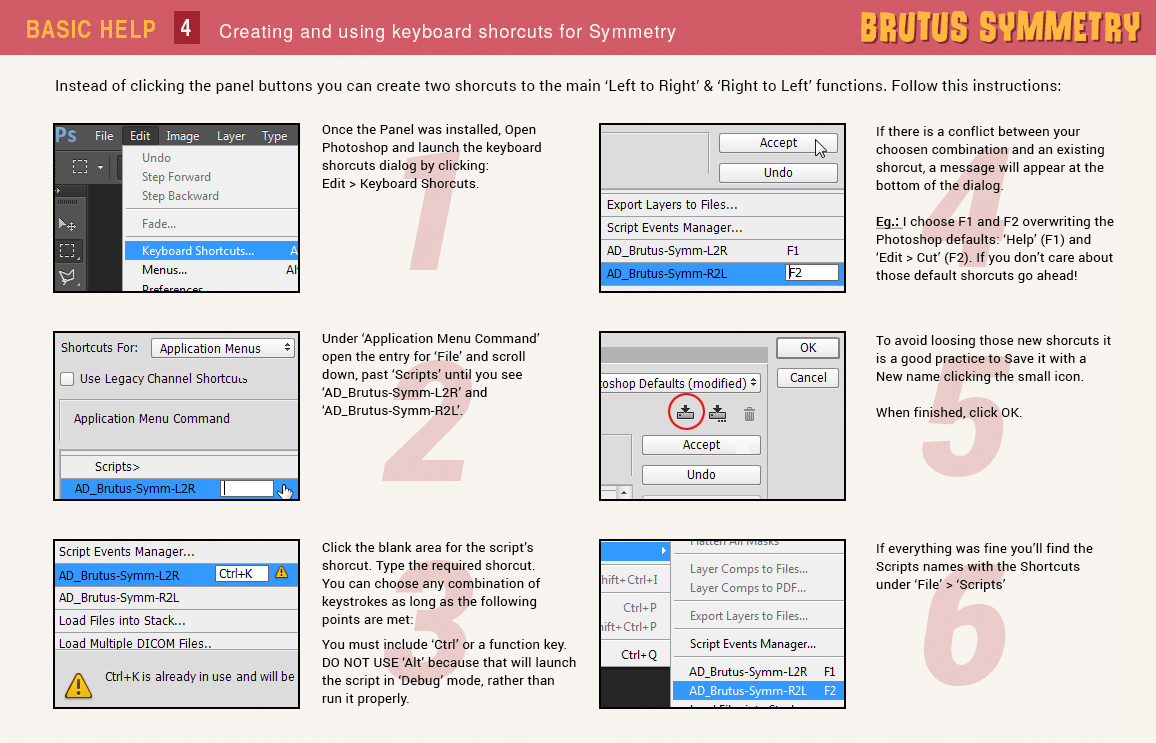
Creating and using keyboard shorcuts for Symmetry.
Instead of clicking the panel buttons you can create two shorcuts to the main ‘Left to Right’ & ‘Right to Left’ functions. Follow this instructions:
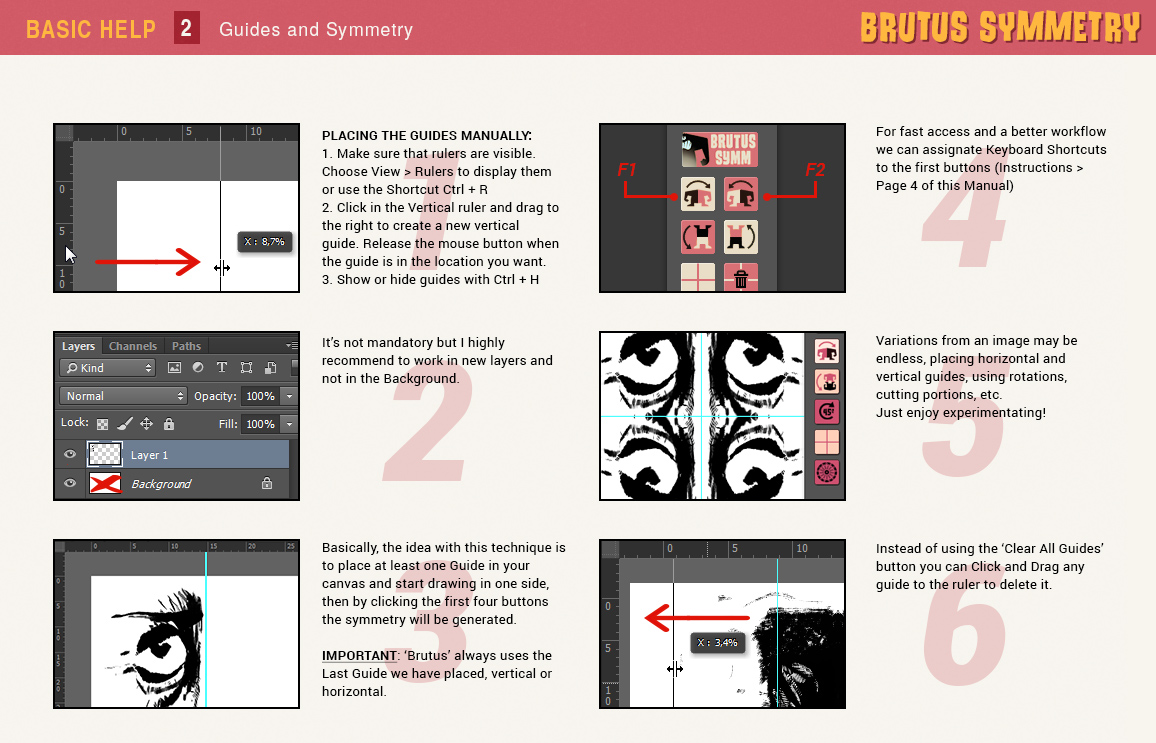
Basic Steps to use Brutus Symmetry
You can start by using the “Centered Guides” button, wich will create one vertical and one horizontal centered guide (the axis for your symmetry), but also you can click and drag a guide from the Photoshop ruler. Brutus will allways work with the latest guide you’ve added (vertical and horizontal), it doesn’t matter if there are one hundred guides it allways use the last vertical and the last horizontal you’ve added.
The PS rulers are activated with the shortcut ‘Ctrl + R’, and at any time if you want to hide the guides without deleting it just press ‘Ctrl + H’.
I recommend to work in a new layer avoiding to work in the Background layer.
The Kaleidograph & the Smart Layers Symmetry.
The Smart Layers technique will only work if you have only one opened document.
I recommend to start with a new document. After clicking the button, the two required layers will be created and opened in vertical windows, side by side, also a message will gives you a basic instruction:
Draw on the left window and use Ctrl + S (Save) to update the right (preview) window.
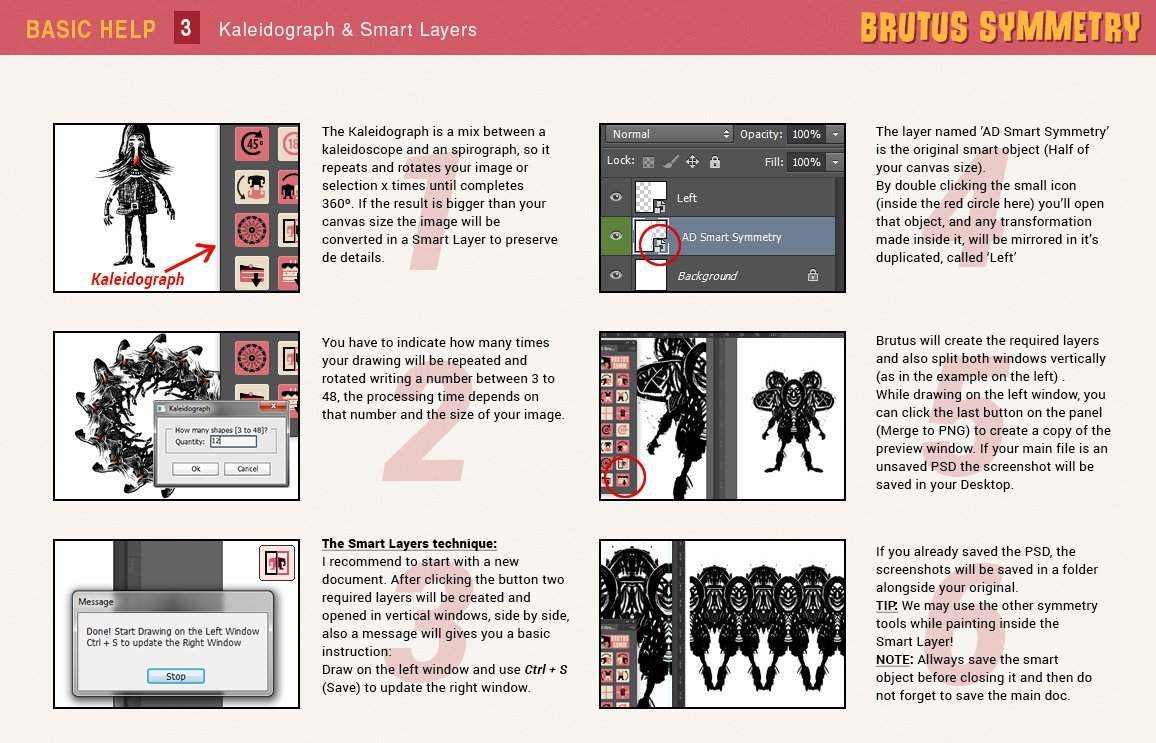
The Layer to PNG & Merged to PNG buttons
The latest two buttons are there to ‘save’ time. The one on the left will save a PNG version of your active layer beside the PSD, if you’re working on an unsaved PSD file, the PNG will be saved in a folder on your Desktop.
And, the latest button (Merge to PNG) will create a merged PNG copy of your document. It detects if you are working on the Smart Layers Symmetry, so you could save the preview window as ‘Screenshot’ without leaving the active working window.
Manual Installation.
- Close Photoshop if it’s running.
- Unzip the ad.brutussymmetry.zxp file
- Inside the HTML folder there is another ad.brutussymmetry.zxp
Unzip that file to a folder named ad.brutussymmetry - Then check -very carefully- that you have that ad.brutussymmetry folder
with ONLY this contents inside:
css/
CSXS/
icons/
images/
js/
jsx/
META-INF/
index.html
mimetype
- Move or Copy that folder with ALL its contents to:
WIN: C:\Program Files (x86)\Common Files\Adobe\CEP\extensions
(before latest Adobe updates it was at C:\your-username\AppData\Roaming\Adobe\CEP\extensions)
MAC: ~/Library/Application Support/Adobe/CEP/extensions
- Back to the first unzipped file and from the SCRIPTS folder move
AD_Brutus-Symm-L2R.jsx and AD_Brutus-Symm-R2L.jsx to:
WIN: C:\Program Files\Adobe\Photoshop\Presets\Scripts
MAC: Applications/Photoshop/Presets/Scripts
- Launch Photoshop and open the Panel from:
Window > Extensions > AD Brutus Symmetry
Troubleshooting.
- Just in case, Photoshop Panels must be found here:
Mac:
PS CC: ~/Library/Application/Support/Adobe/CEPServiceManager4/extensions/
PS CC 2014: ~/Library/Application Support/Adobe/CEP/extensions/
Win 32bit:
C:\Program Files\Common Files\Adobe\CEP\extensions\
Win 64bit:
C:\Program Files (x86)\Common Files\Adobe\CEP\extensions\ - If the installation was fine but after launch the Panel inside Photoshop it doesn’t work, probably (90%) you have some kind of trouble with your Adobe products installation.
If you’re having some ‘common trouble’ with a bad installation or bad update of some Adobe products they suggest to use a cleaner tool here:
https://helpx.adobe.com/creative-suite/kb/cs5-cleaner-tool-installation-problems.html
but the solution change from one machine to the other so I can’t reccomend a 100% secure fix. We just know that if the panel is listed in the extension manager there’s no trouble with the panel itself. - Take care when using the 45º Rotation tool, it’s included just as a helper for sketching or brainstorming, do not use it in final artworks!
Photoshop can’t make 45º rotations without destroying the image progressively (mathematics!), so if you use this tool many times in the same image the quality will be reduced with each click.